Helix/bwVisu/Usage: Difference between revisions
H Schumacher (talk | contribs) m (Added shell info) |
H Schumacher (talk | contribs) m (Added output.log information, formatting) |
||
| (3 intermediate revisions by the same user not shown) | |||
| Line 15: | Line 15: | ||
[[File:BwVisuFiles.png|bwVisu-files|center|x300px]] |
[[File:BwVisuFiles.png|bwVisu-files|center|x300px]] |
||
Data on SDS@hd (under /mnt/sds-hd) can only be accessed from within jobs. Therefore, you need to open a terminal (within a JupyterLab or Rstudio job or directly on Helix) and set a symbolic link to your SDS@hd folder in your home directory. For example like this: |
'''<u>For SDS@hd users:</u>''' Data on SDS@hd (under /mnt/sds-hd) can only be accessed from within jobs. Therefore, you need to open a terminal (within a JupyterLab or Rstudio job or directly on Helix) and set a symbolic link to your SDS@hd folder in your home directory. For example like this: |
||
<pre>cd $HOME |
<pre>cd $HOME |
||
mkdir sds-hd |
mkdir sds-hd |
||
cd sds-hd |
cd sds-hd |
||
ln -s /mnt/sds-hd/sd16a001 sd16a001</pre |
ln -s /mnt/sds-hd/sd16a001 sd16a001</pre> |
||
=== Interactive Apps === |
=== Interactive Apps === |
||
| Line 35: | Line 35: | ||
[[File:bwVisuConcept.png|center|x170px]] |
[[File:bwVisuConcept.png|center|x170px]] |
||
<ol> |
<ol> |
||
<li>At the start page of the web frontend, you can start a new job by clicking on an application version in the list of pinned apps.</li> |
<li> At the start page of the web frontend, you can start a new job by clicking on an application version in the list of pinned apps.</li> |
||
<li>You will now see the application description and options to adjust the job resources.</li> |
<li>You will now see the application description and options to adjust the job resources.</li> |
||
<ul> |
<ul> |
||
<li> To find the best resource settings for your jobs, please have a look at the [https://helix-monitoring.bwservices.uni-heidelberg.de/ bwForCluster Helix monitoring portal] . There, you can see how much of the requested resources where actually used by your jobs. |
|||
<li>At the bottom of the page, beneath the <code>Launch</code> button, you can find a link for accessing the logs/session data of all your jobs.</li> |
<li> At the bottom of the page, beneath the <code>Launch</code> button, you can find a link for accessing the logs/session data of all your jobs.</li> |
||
<li>The interface can differ per app because each app can have individual configuration options. </li> |
<li>The interface can differ per app because each app can have individual configuration options. </li> |
||
[[File:bwVisuRStudio.png|bwVisu-rstudio|center|x200px]]</li> |
[[File:bwVisuRStudio.png|bwVisu-rstudio|center|x200px]]</li> |
||
| Line 75: | Line 76: | ||
== Troubleshooting == |
== Troubleshooting == |
||
Maintance windows and known issues are communicated via the email list or the ''News'' section at the bwVisu start page in the wiki. |
|||
* Depending on the problem, it can help to look up the related bwForCluster Helix wiki pages. For example: |
|||
For example: |
|||
* Error: Disk space exceeded → '''[https://wiki.bwhpc.de/e/Helix/Filesystems#Troubleshooting Filesystems: Troubleshooting]''' |
*: '''Error:''' Disk space exceeded → '''[https://wiki.bwhpc.de/e/Helix/Filesystems#Troubleshooting Filesystems: Troubleshooting]''' |
||
* '''Issue:''' The webservice is not accessible. |
|||
*: If you're a bwForCluster Helix user, you need to have logged in to Helix at least once so that you're home directory gets created. Afterwards, the webservice page should be accessible. |
|||
* '''Issue:''' The bwVisu job fails or doesn't start. |
|||
*: You can try to look for the issue yourself: |
|||
*:* Reload the page without using the cache: <code>Strg+Shift+R</code> (Windows/Linux) or <code>Cmd+Shift+R</code> (Mac) |
|||
*:* Empty the browser cache: |
|||
*:** Chrome/Edge: <code>Strg+Shift+Entf</code> → choose timeframe all → choose ''Images and Files in Cache'' → choose ''Delete Files'' |
|||
*:** Firefox: <code>Strg+Shift+Entf</code> → choose timeframe all → choose ''Cache'' → choose ''Delete Files'' |
|||
*:* Test alternative browser (Firefox, Chrome, Edge, ...) |
|||
*:* Use a private session (without saved cookies and cache): <code>Strg+Shift+N</code> (Chrome) or <code>Strg+Shift+P</code> (Firefox). |
|||
* '''Support:''' If you can't solve the issue, write to the support and provide the following information: |
|||
** Date and time of the issue. |
|||
** Job-id (the number in brackets after the jobname) |
|||
** The <code>output.log</code> file that you can find when following the session id link. |
|||
** Please report patterns that you recognize. For example: |
|||
*** The issue happens around a specific time of day. |
|||
*** The issue is connected to the duration of usage (e.g. happens always after ca. one hour). |
|||
*** The issue appears after specific user interactions (using a specific method, opening the terminal, clicking a specific button, ...) |
|||
: You might be asked for further information: |
|||
:* The internet browser that you user and its version. For example Firefox 128. |
|||
:* Provide more information about network traffic via a HAR-file. First start a job and open the application. Then follow he instructions below: |
|||
:** Instructions for Chrome/Edge: |
|||
:**# Open developer tools with <code>F12</code> or right click -> ''Inspect'' Then choose the tab ''Network''. |
|||
:**# Activate the checkbox ''Preserve log''. |
|||
:**# Reproduce the issue in the current tab. |
|||
:**# After the problem happened again: Click the export symbol (⬇️) in the menu of the network-tabs and choose ''Export HAR...''. |
|||
:** Instructions for Firefox: |
|||
:**# Open developer tools with <code>F12</code> and choose the tab ''Network analysis''. |
|||
:**# Click the settings symbol (⚙️) and activate ''Continuous Protocol''. |
|||
:**# Reproduce the issue in the current tab. |
|||
:**# After the problem happened again: Click the settings symbol again (⚙️) and choose ''Save everything as HAR''. |
|||
Latest revision as of 12:34, 6 May 2026
bwVisu is quite simple and intuitively designed to make launching apps on the cluster as user-friendly as possible. Once you have successfully logged into bwVisu, the first thing you see is a list of pinned apps. These are the available apps that you can launch as a job on the cluster.
In the navigation bar, the user has the following options:
Files — Interactive Apps — My Interactive Sessions — Shell
Files
Here, you can access your home directory on Helix. In a graphical user interface, files can be downloaded and uploaded, and new files and folders can be created. You will encounter an error message if you try to see data that you have no access to.
In the Home Directory the results and logs from the apps are stored. You get the following interface:

For SDS@hd users: Data on SDS@hd (under /mnt/sds-hd) can only be accessed from within jobs. Therefore, you need to open a terminal (within a JupyterLab or Rstudio job or directly on Helix) and set a symbolic link to your SDS@hd folder in your home directory. For example like this:
cd $HOME
mkdir sds-hd
cd sds-hd
ln -s /mnt/sds-hd/sd16a001 sd16a001
Interactive Apps
This displays the apps that the user can run on the cluster, possibly across multiple nodes. These apps initiate an interactive session which the user can directly connect to and, depending on the app, receive a graphical interface.
My Interactive Sessions
At bwVisu, it is possible to start several interactive apps simultaneously. Here, one can view an overview of currently running interactive apps and completed sessions. It is also possible to view the log for each session. As soon as one starts an interactive app, one is automatically redirected here. Even if you log out of bwVisu and log back in, you can still see the information and logs from the finished interactive apps here until you delete it.
Shell
For bwForCluster Helix users only: After entering your OTP and password a shell on the login node of bwForCluster Helix opens. This way, you can for example create workspaces when you need more space. Please look up the details under Helix Workspaces. They can't be seen in the File Viewer but are available within the bwVisu jobs.
Start a Job

- At the start page of the web frontend, you can start a new job by clicking on an application version in the list of pinned apps.
- You will now see the application description and options to adjust the job resources.
- To find the best resource settings for your jobs, please have a look at the bwForCluster Helix monitoring portal . There, you can see how much of the requested resources where actually used by your jobs.
- At the bottom of the page, beneath the
Launchbutton, you can find a link for accessing the logs/session data of all your jobs. - The interface can differ per app because each app can have individual configuration options.
- Click the
Launchbutton to start a new job with this application. You can't start two jobs with the same application. Launching an app can take some time depending on the requested resources and cluster utilization. - The
Interactive Sessionspage opens with the details of your job. - Host: Indicates on which nodes the application is running.
- Time Remaining: Each application is given a time limit, which can also be set in advance. In this example, the application is supposed to run for one hour.
- Session ID: This is a link that leads to the folder of the session. Among other things, application logs are displayed here, which can be viewed in the UI.
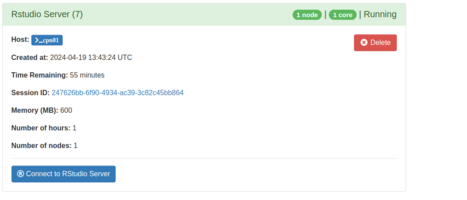
- Connect to the job with your browser by clicking
connect to <application>.


Adjust noVNC Applications


noVNC is an open-source VNC browser client. Some bwVisu applications use noVNC and therefore, come with additional options in the view of the job details and an additional menu within the running application.
- Running Job View on the interactive sessions page
- Compression slider: Before opening the application, you can choose the compression level to use. 0 means no compression while 9 offers the best compression but uses more CPU resources on the cluster which can be slower.
- Image Quality slider: Before opening the application, you can choose the image quality level. With this you can control the desired JPEG quality.
- View Only (Share-able Link) button: By clicking this button the application opens in view only mode. You can share this link with collaborators or students while you launch your noVNC application normally for yourself. This way, others can follow what you are doing. For every job you need to generate a new link.
- noVNC menu within the running application
- When you open the application you can see an additional menu on the left with options. For the ones using the application in view-only mode it is helpful to select the option to show a dot instead of not showing the mouse cursor at all. Therefore go to "Options" and then "Expand".
- For copying data, you need to use the clipboard. When copying something locally, you need to put it into the clipboard before you can use it within the application. The same goes the other way around.
- Adjust window size and position of the app by executing a right click at the edge of the app window frame, so that a menu shows up.
Terminate a Job
The job will terminate when the job runtime requested in the job submission form has expired To terminate an application yourself, you can click the delete button or end the application in the interactive session. If the app is terminated in the interactive session, the window no longer shows Running but Completed. With the Delete button, you end the session and also remove the list entry from My Interactive Sessions.
Troubleshooting
Maintance windows and known issues are communicated via the email list or the News section at the bwVisu start page in the wiki.
- Depending on the problem, it can help to look up the related bwForCluster Helix wiki pages. For example:
- Error: Disk space exceeded → Filesystems: Troubleshooting
- Issue: The webservice is not accessible.
- If you're a bwForCluster Helix user, you need to have logged in to Helix at least once so that you're home directory gets created. Afterwards, the webservice page should be accessible.
- Issue: The bwVisu job fails or doesn't start.
- You can try to look for the issue yourself:
- Reload the page without using the cache:
Strg+Shift+R(Windows/Linux) orCmd+Shift+R(Mac) - Empty the browser cache:
- Chrome/Edge:
Strg+Shift+Entf→ choose timeframe all → choose Images and Files in Cache → choose Delete Files - Firefox:
Strg+Shift+Entf→ choose timeframe all → choose Cache → choose Delete Files
- Chrome/Edge:
- Test alternative browser (Firefox, Chrome, Edge, ...)
- Use a private session (without saved cookies and cache):
Strg+Shift+N(Chrome) orStrg+Shift+P(Firefox).
- Reload the page without using the cache:
- You can try to look for the issue yourself:
- Support: If you can't solve the issue, write to the support and provide the following information:
- Date and time of the issue.
- Job-id (the number in brackets after the jobname)
- The
output.logfile that you can find when following the session id link. - Please report patterns that you recognize. For example:
- The issue happens around a specific time of day.
- The issue is connected to the duration of usage (e.g. happens always after ca. one hour).
- The issue appears after specific user interactions (using a specific method, opening the terminal, clicking a specific button, ...)
- You might be asked for further information:
- The internet browser that you user and its version. For example Firefox 128.
- Provide more information about network traffic via a HAR-file. First start a job and open the application. Then follow he instructions below:
- Instructions for Chrome/Edge:
- Open developer tools with
F12or right click -> Inspect Then choose the tab Network. - Activate the checkbox Preserve log.
- Reproduce the issue in the current tab.
- After the problem happened again: Click the export symbol (⬇️) in the menu of the network-tabs and choose Export HAR....
- Open developer tools with
- Instructions for Firefox:
- Open developer tools with
F12and choose the tab Network analysis. - Click the settings symbol (⚙️) and activate Continuous Protocol.
- Reproduce the issue in the current tab.
- After the problem happened again: Click the settings symbol again (⚙️) and choose Save everything as HAR.
- Open developer tools with
- Instructions for Chrome/Edge: