SDS@hd/Access/SMB: Difference between revisions
H Schumacher (talk | contribs) m (Tidied up section) |
H Schumacher (talk | contribs) m (Corrected link) |
||
| (2 intermediate revisions by the same user not shown) | |||
| Line 3: | Line 3: | ||
== Prerequisites == |
== Prerequisites == |
||
The SMB connection has to be established at least with protocol version SMB2.02, which is available since Windows Vista or OSX 10.7, and a NTLMv2 authentication level of "Send NTLMv2 responses only". |
* The SMB connection has to be established at least with protocol version SMB2.02, which is available since Windows Vista or OSX 10.7, and a NTLMv2 authentication level of "Send NTLMv2 responses only". |
||
== Windows == |
== Windows == |
||
| Line 10: | Line 10: | ||
=== Needed Information === |
=== Needed Information === |
||
You need the following information:<br /> |
You need the following information (→ see [[SDS@hd/Access|SDS@hd/Access]]):<br /> |
||
'''Username:''' <code>BWSERVICESAD\<username></code><br /> |
'''Username:''' <code>BWSERVICESAD\<username></code><br /> |
||
'''Password:''' <code><service_password></code><br /> |
'''Password:''' <code><service_password></code><br /> |
||
'''Network Path''' in UNC syntax ''':''' <code>\\lsdf02.urz.uni-heidelberg.de\<sv_acronym></code> |
'''Network Path''' in UNC syntax ''':''' <code>\\lsdf02.urz.uni-heidelberg.de\<sv_acronym></code> |
||
=== Instructions === |
=== Instructions === |
||
| Line 100: | Line 99: | ||
For this reason we can use the same [[Sds-hd_nfs#configure kerberos environment for SDS@hd|SSSD setup]] for cifs like we use for the kerberized nfs-Setup. |
For this reason we can use the same [[Sds-hd_nfs#configure kerberos environment for SDS@hd|SSSD setup]] for cifs like we use for the kerberized nfs-Setup. |
||
--> |
--> |
||
| ⚫ | |||
'''Example:''' |
|||
| ⚫ | |||
| ⚫ | |||
| ⚫ | |||
| ⚫ | |||
| ⚫ | |||
| ⚫ | |||
| ⚫ | |||
| ⚫ | |||
| ⚫ | |||
| ⚫ | |||
| ⚫ | |||
| ⚫ | |||
| ⚫ | |||
| ⚫ | |||
| ⚫ | |||
| ⚫ | |||
| ⚫ | |||
| ⚫ | |||
| ⚫ | |||
| ⚫ | |||
| ⚫ | |||
| ⚫ | |||
=== Mounting a SDS@hd Share === |
=== Mounting a SDS@hd Share === |
||
| Line 142: | Line 113: | ||
'''Nevertheless the ownership and access rights defined in this way are only simulated on the client and are not really transferred to the server.''' If access rights are changed on the client or files with other owners are created in shared folders, these changes only apply to the client and only until the next remount. |
'''Nevertheless the ownership and access rights defined in this way are only simulated on the client and are not really transferred to the server.''' If access rights are changed on the client or files with other owners are created in shared folders, these changes only apply to the client and only until the next remount. |
||
If you need to work with the correct server side permissions, please follow the setup of a [[SDS@hd/Access/ |
If you need to work with the correct server side permissions, please follow the setup of a [[SDS@hd/Access/SMB#Multiuser_Environment|MultiUser Setup]] |
||
===== Preparations ===== |
===== Preparations ===== |
||
| Line 300: | Line 271: | ||
For further information about handling kerberos tickets take a look at [[SDS@hd/Access/NFS#Access_your_data|SDS@hd kerberos]] |
For further information about handling kerberos tickets take a look at [[SDS@hd/Access/NFS#Access_your_data|SDS@hd kerberos]] |
||
| ⚫ | |||
| ⚫ | |||
| ⚫ | |||
| ⚫ | |||
| ⚫ | |||
| ⚫ | |||
| ⚫ | |||
| ⚫ | |||
| ⚫ | |||
| ⚫ | |||
| ⚫ | |||
| ⚫ | |||
| ⚫ | |||
| ⚫ | |||
| ⚫ | |||
| ⚫ | |||
| ⚫ | |||
| ⚫ | |||
| ⚫ | |||
| ⚫ | |||
| ⚫ | |||
| ⚫ | |||
| ⚫ | |||
Latest revision as of 11:18, 10 April 2026
SMB is a Server Message Block protocol. It has different implementations: CIFS (outdated), SMB2, SMB3, Samba
Prerequisites
- The SMB connection has to be established at least with protocol version SMB2.02, which is available since Windows Vista or OSX 10.7, and a NTLMv2 authentication level of "Send NTLMv2 responses only".
Windows
Use a SMB share via Windows Explorer.
Needed Information
You need the following information (→ see SDS@hd/Access):
Username: BWSERVICESAD\<username>
Password: <service_password>
Network Path in UNC syntax : \\lsdf02.urz.uni-heidelberg.de\<sv_acronym>
Instructions
Open the Windows Explorer.
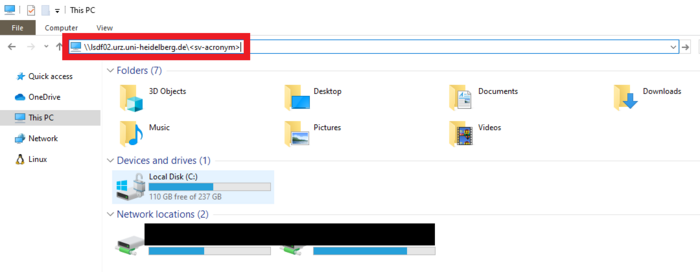
a) To establish a non-permanent connection:
- Click on the address bar, which is located at the top of the Explorer.
- Enter the network path and press Enter.
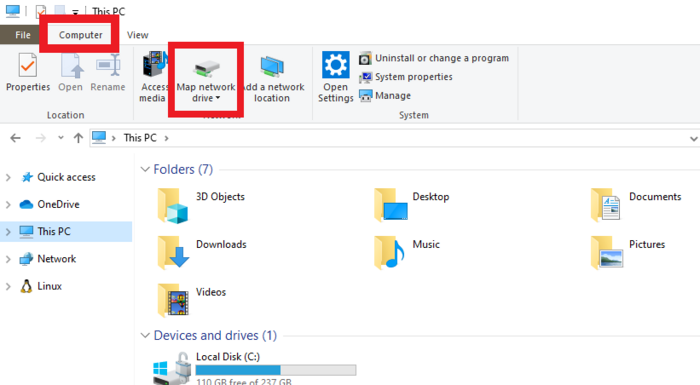
b) To establish a permanent connection by creating a network (pseudo) drive:
- Navigate to "This PC". At the top of the window, click on Computer and select Map network drive.
- Choose a drive letter to be associated with the network drive and enter the network path. Select use a different identification, as these differ from your credentials used locally.
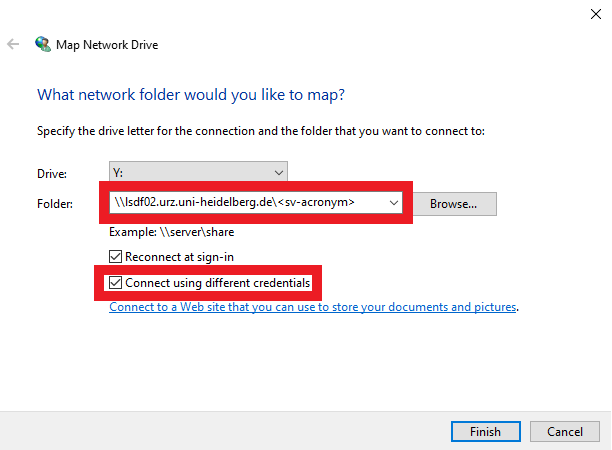
You will then be prompted to enter your credentials.
After logging in successfully, your network drive will appear under This PC. You can now manipulate your files as accustomed.


Troubleshooting
- Errors:
- This network folder is currently connected under a different name and password. Disconnect the already existing connection.
- Multiple connections to a server from the same user while using different usernames is not allowed.
- Disconnect old connections.
- Solutions:
- Disconnect already exsting connections: Right click on "My PC". Click "Further Options". Click "Disconnect Drives". Keep in mind that Windows can't connect multiple network drives when they have different login information.
- Remove / adjust the login information by going to the credential management (Anmeldeinformationsverwaltung).
- Error: "Your domain is not available. Make sure that you're connected to your organizational network."
- Solutions:
- Make sure to be in the correct network, for example by connecting via VPN.
- Do not use LAN and WLAN at the same time.
- Solutions:
MacOS
Create a network drive with Finder.
Needed Information
You need the following information:
Username: BWSERVICESAD\<username>
Password: ServicePassword
Network Path: smb://lsdf02.urz.uni-heidelberg.de/<sv-acronym>
Instructions
- Open Finder
- On the menu bar click on Go -> Connect to Server (or use ⌘+K)
- Insert server address and click Connect
- Insert username and password and click Connect
- Finder opens new connected SMB share


Linux
A UNIX like operating system needs a CIFS client to use a share. CIFS clients are part of Samba implementation for Linux and other UNIX like operating systems (http://www.samba.org)
Attention: The core CIFS protocol does not provide unix ownership information or mode for files and directories. Because of this, files and directories will generally appear to be owned by whatever values the uid= or gid= options are set, and will have permissions set to the default file_mode and dir_mode for the mount. Attempting to change these values via chmod/chown will return success but have no effect.
For security reasons, server side permission checks cannot be overriden. The permission checks done by the server will always correspond to the credentials used to mount the share, and not necessarily to the user who is accessing the share.
Although mapping of POSIX UIDs and SIDs is not needed mounting a CIFS share it might become necessary when working with files on the share, e.g. when modifying ACLs.
Mounting a SDS@hd CIFS share can be done by using username/password credentials or by using kerberos tickets. Information about settting up a kerberos environment for SDS@hd can be found *here*.
Single-User Environment
A share can be mounted to a local directory, (e.g. /mnt/sds-hd ). Depending on your system setup, root privileges may be required.
CIFS normally binds all shares on the client as the property of the user who mounted them and transfers any existing write rights only to the user. With additional information from uid, gid, file_mode and dir_mode, other ownership and access rights can be defined when mounting on the client.
Nevertheless the ownership and access rights defined in this way are only simulated on the client and are not really transferred to the server. If access rights are changed on the client or files with other owners are created in shared folders, these changes only apply to the client and only until the next remount.
If you need to work with the correct server side permissions, please follow the setup of a MultiUser Setup
Preparations
# Create locally an empty directory to mount to
mkdir </path/to/empty/folder>
Mount over command line
sudo mount -t cifs -o username=<username>,domain=BWSERVICESAD,vers=3,mfsymlinks  //lsdf02.urz.uni-heidelberg.de/<sv-acronym> </mnt/sds-hd>
> Password:
Mount over /etc/fstab
# Open /etc/fstab
sudo nano /etc/fstab
# Add the following
//lsdf02.urz.uni-heidelberg.de/<sv_acronym>   </path/to/empty/folder>   cifs  uid=1000,gid=1000,user,vers=3,mfsymlinks,credentials=<$HOME/.credentialsfile>,noauto  0 0
# Make the system use the changed file
systemctl daemon-reload

# Make credentialsfile
cat /<$HOME/.credentialsfile>
username=ab_ xy123
password=<servicePassword>
domain=BWSERVICESAD

# Mount by providing the same path as was used in /etc/fstab
mount </path/to/empty/folder>
Check details
df -h | grep mnt
> //lsdf02.urz.uni-heidelberg.de/sd16j007   108T    6,6T  101T    7% /mnt/sds-hd
mount | grep lsdf02
> //lsdf02.urz.uni-heidelberg.de/sd16j007 on /mnt/sds-hd type cifs > (rw,relatime,vers=3.1.1,cache=strict,username=xxxx,domain=BWSERVICESAD,uid=1000,forceuid,gid=0,noforcegid,addr=xxxxx,file_mode=0755,dir_mode=0755,soft,nounix,serverino,mapposix,rsize=1048576,wsize=1048576,echo_interval=60,actimeo=1)
Remove mount
umount </path/to/mounted/folder>
Multiuser Environment
|
|
At the moment, file deletion is not possible with this setup. We are working on solving the issue. |
By default, CIFS mounts only use a single set of user credentials (the mount credentials) when accessing a share. To support different user session on the same mountpoint and the correct permission/ownership processing, the mount options
multiuser,cifsacl
have to be used. Because the kernel cannot prompt for passwords, multiuser mounts are limited to mounts using passwordless sec= options, like with sec=krb5. Information about settting up a kerberos environment can be found *here*
ID Mapping
In a Multiuser Environment it is important to get the correct ownerships and permissions from the server. Therefor you need to setup a ID Mapping environment.
Additionally we need the following packages to enable CIFS Mapping:
- RedHat/CentOS:
$ yum install cifs-utils keyutils
- Debian/Ubuntu:
$ apt install cifs-utils keyutils
After installing SSSD you have to ensure that it will be used for CIFS name resolution, e.g.
- RedHat/CentOS:
On RedHat SSSD should have allready a higher priority than winbind:
$ alternatives --display cifs-idmap-plugin

cifs-idmap-plugin - Status ist automatisch.
 Link verweist auf /usr/lib64/cifs-utils/cifs_idmap_sss.so
/usr/lib64/cifs-utils/cifs_idmap_sss.so - priority 20
/usr/lib64/cifs-utils/idmapwb.so - priority 10
Zur Zeit ist die `best' Version /usr/lib64/cifs-utils/cifs_idmap_sss.so.
- Debian/Ubuntu:
On Debian systems SSSD has to be registered for ID mapping with an higher priority than winbind:
$ sudo update-alternatives --install /etc/cifs-utils/idmap-plugin idmap-plugin /usr/lib/x86_64-linux-gnu/cifs-utils/cifs_idmap_sss.so 50

$ update-alternatives --display idmap-plugin
idmap-plugin - automatischer Modus
  beste Version des Links ist /usr/lib/x86_64-linux-gnu/cifs-utils/cifs_idmap_sss.so
  Link verweist zur Zeit auf /usr/lib/x86_64-linux-gnu/cifs-utils/cifs_idmap_sss.so
  Link idmap-plugin ist /etc/cifs-utils/idmap-plugin
  Slave idmap-plugin.8.gz ist /usr/share/man/man8/idmap-plugin.8.gz
/usr/lib/x86_64-linux-gnu/cifs-utils/cifs_idmap_sss.so - Priorität 50
/usr/lib/x86_64-linux-gnu/cifs-utils/idmapwb.so - Priorität 40
  Slave idmap-plugin.8.gz: /usr/share/man/man8/idmapwb.8.gz
AutoFS Setup
Because CIFS shares, in contrast to nfs-Mounts, have to be mounted directly, the root user can not simply mount them into a global folder. Instead the shares have to be initially mounted by a user who has access to the Share. To achieve this, you can use the automounter "autofs".
- RedHat/CentOS:
$ yum install autofs
$ systemctl enable autofs
$ systemctl start autofs
- Debian/Ubuntu:
$ apt install autofs
$ systemctl enable autofs
$ systemctl start autofs
Afterwards you configure the SDS@hd Speichervorhaben in a new map file:
$ cat /etc/auto.sds-hd
<sv-acronym1>    -fstype=cifs,cifsacl,multiuser,sec=krb5,cruid=${UID},vers=3,mfsymlinks  ://lsdf02.urz.uni-heidelberg.de/<sv-acronym1>
<sv-acronym2>    -fstype=cifs,cifsacl,multiuser,sec=krb5,cruid=${UID},vers=3,mfsymlinks  ://lsdf02.urz.uni-heidelberg.de/<sv-acronym2>
....
You have to include the new map into the auto.master file:
$ cat /etc/auto.master
[...]
/mnt/sds-hd   /etc/auto.sds-hd
[...]
To display all available SDS@hd shares on this machine to the users, you should enable "browser_mode":
$ cat /etc/autofs.conf
[...]
# to display all available SDS-hd shares on this to the users
browse_mode=yes
[...]
otherwise each share-folder will only be visible after a user has mounted.
After changing the configuration, you should restart the autofs daemon, e.g.:
$ systemctl restart autofs
Of course you can adopt all other autofs options, like timeouts, etc. to the specific needs of your environment or use any other method for dynamically mounting the CIFS shares.
Now each user should be able to mount a SDS@hd share, which is configured for the machine. If a share is allready mounted, other users will access this share with their own credentials without mounting again.
To get access, each user needs a valid kerberos ticket, which can be fetched with
$ kinit hd_xy123
For further information about handling kerberos tickets take a look at SDS@hd kerberos
SMB Client
To list the files in a SMB share, use the program smbclient.
smbclient -U 'BWSERVICESAD\<username>'  //lsdf02.urz.uni-heidelberg.de/<sv-acronym>
Enter BWSERVICESAD\<username>'s password:
The program allows you to access the files with a FTP like tool in an interactive shell.
$ smbclient //lsdf02.urz.uni-heidelberg.de/<sv-acronym> -U 'BWSERVICESAD\<username>'
Enter BWSERVICESAD\<username>'s password:
smb: \> ls
  .                    D        0  Thu Apr 23 12:51:48 2020
  ..                   D        0  Wed Apr 22 21:54:04 2020
  bench                D        0  Fri Jul 26 10:24:05 2019
  benchmark_test       D        0  Tue Oct 30 16:12:21 2018
  checksums            D        0  Mon Sep 18 10:24:21 2017
  test.multiuser       A        6  Thu Apr 23 12:36:07 2020
  test                 A        7  Thu Apr 23 09:38:13 2020
  .....
  .snapshots         DHR        0  Thu Jan  1 01:00:00 1970

                115343360000 blocks of size 1024. 108260302848 blocks available
smb:\