BinAC/Software/Jupyterlab: Difference between revisions
F Bartusch (talk | contribs) No edit summary |
F Bartusch (talk | contribs) No edit summary |
||
| (17 intermediate revisions by the same user not shown) | |||
| Line 6: | Line 6: | ||
|- |
|- |
||
| module load |
| module load |
||
| |
| devel/jupyterlab |
||
|- |
|- |
||
| License |
| License |
||
| [https://github.com/jupyterlab/jupyterlab/blob/main/LICENSE |
| [https://github.com/jupyterlab/jupyterlab/blob/main/LICENSE JupyterLab License] |
||
|- |
|- |
||
| Links |
| Links |
||
| Line 21: | Line 21: | ||
JupyterLab is a web-based interactive development environment for notebooks, code, and data. |
JupyterLab is a web-based interactive development environment for notebooks, code, and data. |
||
Currently BinAC provides the following [https://jupyter-docker-stacks.readthedocs.io/en/latest/using/selecting.html#jupyter-minimal-notebook JupyterLab Docker images] via Apptainer: |
|||
* minimal-notebook |
|||
* r-notebook |
|||
= Usage = |
= Usage = |
||
This guide is valid for for <code>minimal-notebook</code>. You can follow the guide also for <code>r-notebook</code>, but you have to use <code>r-notebook.pbs.template</code> as template for your jobscript. |
|||
== Start Jupyterlab == |
|||
== Start JupyterLab == |
|||
The module provides a |
The module provides a job script for starting a JupyterLab instance on the BinAC <code>inter</code> queue. |
||
Load the module and copy the |
Load the module and copy the job script into your workspace: |
||
<pre> |
<pre> |
||
| Line 34: | Line 41: | ||
</pre> |
</pre> |
||
You can adjust the following settings in the |
You can adjust the following settings in the job script according to your needs. |
||
<pre> |
<pre> |
||
| Line 44: | Line 51: | ||
Please note the restrictions of the inter queue: |
Please note the restrictions of the inter queue: |
||
* max. walltime: 12 hours |
* max. walltime: 12 hours |
||
* max. nodes: 1 |
|||
* max. cores: 28 |
* max. cores: 28 |
||
* max jobs per user: 1 |
* max jobs per user: 1 |
||
Then submit the job |
Then submit the job. |
||
qsub jupyterlab.pbs |
|||
11604591 |
|||
<pre> |
|||
== Access Jupyterlab> == |
|||
jobid=$(qsub jupyterlab.pbs) |
|||
</pre> |
|||
== Create SSH tunnel == |
|||
The compute node on which JupyterLab is running is not reachable directly from your workstation. |
|||
The information you need to access Jupyterlab is printed in the job's standard output file. |
|||
Hence you have to create an SSH tunnel from your workstation to the compute node through a BinAC login node. |
|||
Here is an example output. Please note that details like IP and port numbers will vary. |
|||
The job's standard output file (<code>Jupyterlab.<jobid></code>) contains the SSH command for this tunnel. |
|||
Please note that details like IP, port number, and access URL will vary. |
|||
<pre> |
<pre> |
||
cat JupyterLab. |
cat JupyterLab.o${jobid} |
||
</pre> |
|||
[[File:Binac_jupyterlab_connection_details.png | 800px | center | JupyterLab connection info]] |
|||
Attempt 1: Checked port 18617, port is free ... |
|||
=== Linux Users === |
|||
Paste this ssh command in a terminal on local host (i.e., laptop) |
|||
----------------------------------------------------------------- |
|||
ssh -N -L 18617:172.17.5.1:18617 $USER@login03.binac.uni-tuebingen.de |
|||
Copy the <code>ssh -N -L ... </code> command and execute it in a shell on your workstation. |
|||
Open this address in a browser on local host; see token below. |
|||
After a successfull authentication the SSH tunnel is ready to use. |
|||
----------------------------------------------------------------- |
|||
The ssh command does not return a result. |
|||
localhost:18617 (prepend with https:// if using a password) |
|||
If there is no error message everything should be fine: |
|||
[[File:Binac_jupyterlab_ssh_tunnel_linux.png | 800px | center | Creation of SSH tunnel on Linux]] |
|||
[...] |
|||
=== Windows Users === |
|||
If you are using Windows you will need to create the SSH tunnel in the SSH client of your choice (e.g. MobaXTerm, PuTTY, etc.). |
|||
==== MobaXTerm ==== |
|||
Select <code>Tunneling</code> in the top ribbon. Then press <code>New SSH tunnel</code>. |
|||
Then configure the SSH tunnel with the correct values taken the SSH tunnel infos above. |
|||
For the example in this tutorial it looks as follows: |
|||
[[File:Binac_jupyterlab_mobaxterm.png | 800px | center ]] |
|||
== Access JupyterLab == |
|||
JupyterLab is now running on a BinAC compute node and you created an SSH tunnel from your workstation to that compute node. |
|||
Open a browser and copy the URL with the access token into the address field: |
|||
[[File:Binac_jupyterlab_browser_url.png | 800px | center ]] |
|||
Your browser should now display the JupyterLab user interface: |
|||
[[File:Binac_jupyterlab_browser_lab.png | 800px | center ]] |
|||
== Access <code>/beegfs/work/</code> in file browser == |
|||
Jupyterlab's root directory will be your home directory. As your home directory is backuped daily you may want to store your notebooks there. |
|||
In order to access data in your workspace (e.g. somewhere under <code>/beegfs/work</code>) via the file browser you will need to create a symbolic link from your home directory to you workspace: |
|||
<pre> |
|||
ln -s /beegfs/work/<path to your project data> $HOME/<link name> |
|||
</pre> |
</pre> |
||
Through that link in your home directory you can move around your research data in Jupyterlab's file explorer. |
|||
If you're using Linux, copy the ssh command and execute it on your local machine and authenticate yourself with second factor and password. |
|||
The ssh command creates an SSH tunnel through which you can access Jupyterlab in your browser. |
|||
The ssh command does not return a result. If there is no error message everything should be fine. |
|||
Here is an example how I linked to my directory: |
|||
The Jupyterlab output file also contains a direct link to your Jupyterlab: |
|||
[[ File:Binac_jupyterlab_link.png | 800px | center ]] |
|||
== Shut Down JupyterLab == |
|||
You can shut down JupyterLab via <code>File -> Shut Down</code>. |
|||
Please note that this will also terminate your compute job on the BinAC! |
|||
[[ File:Binac_jupyterlab_browser_shutdown.png | 800px | center ]] |
|||
= Managing Kernels = |
|||
The kernels are stored in your Home directory on BinAC: <code>/$HOME/.local/share/jupyter/kernels/</code>. |
|||
You can install new kernels from within the JupyterLab browser window, but you will have to install Miniconda beforehand. |
|||
With Miniconda available, open a new terminal window. |
|||
== Add a new Kernel == |
|||
=== Python === |
|||
There is only a Python 3 kernel installed when you first start JupyterLab. |
|||
Because there are nearly endless combinations of Python versions and packages we encourage you to install the software yourself via Conda. |
|||
This is an example how you create new kernels for Jupyterlab. It's so simple that three commmands suffice: |
|||
<pre> |
<pre> |
||
conda create --name kernel_env python=3.8 pandas numpy matplotlib ipykernel # 1 |
|||
cat JupyterLab.o11604591 |
|||
conda activate kernel_env # 2 |
|||
[...] |
|||
python -m ipykernel install --user --name pandas --display-name="Python 3.8 (pandas)" # 3 |
|||
Or copy and paste one of these URLs: |
|||
[...] |
|||
# Installed kernelspec pandas in /home/tu/tu_tu/tu_iioba01/.local/share/jupyter/kernels/pandas |
|||
http://127.0.0.1:18617/lab?token=<your token> |
|||
</pre> |
</pre> |
||
The first command creates a new Conda environment called <code>kernel_env</code> and installs a specific Python packages plus a few Python packages. It's important that you also install <code>ipykernel</code>. We need <code>ipykernel</code> later to create the JupyterLab kernel. |
|||
== Stop Jupyterlab == |
|||
The second command activates the <code>kernel_env</code> Conda environment. |
|||
The third command creates the new JupyterLab kernel. |
|||
<pre> |
|||
$ ls -lh $HOME/.local/share/jupyter/kernels/ |
|||
total 0 |
|||
drwxr-xr-x 2 tu_iioba01 tu_tu 109 Jul 26 10:38 pandas |
|||
</pre> |
|||
[[ File:Binac_jupyterlab_new_kernel.png | 800px | center ]] |
|||
=== R === |
|||
The instructions for new R-Kernels are a bit different. |
|||
<pre> |
|||
conda config --add channels r |
|||
conda create --name r_kernel_env r-base=4.4.1 r-irkernel |
|||
conda activate r_kernel_env |
|||
R |
|||
# In the R-Session: |
|||
install.packages(...) |
|||
IRkernel::installspec(name = 'ir44', displayname = 'R 4.4.1') |
|||
</pre> |
|||
The first command creates a new Conda environment called <code>r_kernel_env</code> and installs a specific R version. It's important that you also install <code>r-irkernel</code>. We need <code>r-irkernel</code> later to create the JupyterLab kernel. |
|||
The second command activates the <code>r_kernel_env</code> Conda environment and open an R session. In this session you can install whatever R-package you need in your kernel. |
|||
Last, create the new kernel with the <code>installspec</code> command. |
|||
== Remove a Kernel == |
|||
In order to remove a kernel from Jupyterlab, simply remove the corresponding directory in <code>/$HOME/.local/share/jupyter/kernels/</code>: |
|||
<pre> |
|||
# Remove the JupyterLab kernel installed in the previous example |
|||
rm -rf /$HOME/.local/share/jupyter/kernels/pandas |
|||
</pre> |
|||
Also remove the corresponding Conda environment if you don't need it any more: |
|||
<pre> |
|||
conda env remove --name kernel_env |
|||
</pre> |
|||
Latest revision as of 16:15, 31 July 2024
|
The main documentation is available via |
| Description | Content |
|---|---|
| module load | devel/jupyterlab |
| License | JupyterLab License |
| Links | Homepage |
| Graphical Interface | Yes |
Description
JupyterLab is a web-based interactive development environment for notebooks, code, and data.
Currently BinAC provides the following JupyterLab Docker images via Apptainer:
- minimal-notebook
- r-notebook
Usage
This guide is valid for for minimal-notebook. You can follow the guide also for r-notebook, but you have to use r-notebook.pbs.template as template for your jobscript.
Start JupyterLab
The module provides a job script for starting a JupyterLab instance on the BinAC inter queue.
Load the module and copy the job script into your workspace:
module load devel/jupyterlab/7.2.1
cp $JUPYTERLAB_EXA_DIR/jupyterlab.pbs.template jupyterlab.pbs
You can adjust the following settings in the job script according to your needs.
#PBS -l nodes=1:ppn=1          # adjust the number of cpu cores (ppn)
#PBS -l mem=2gb
#PBS -l walltime=6:00:00
Please note the restrictions of the inter queue:
- max. walltime: 12 hours
- max. nodes: 1
- max. cores: 28
- max jobs per user: 1
Then submit the job.
jobid=$(qsub jupyterlab.pbs)
Create SSH tunnel
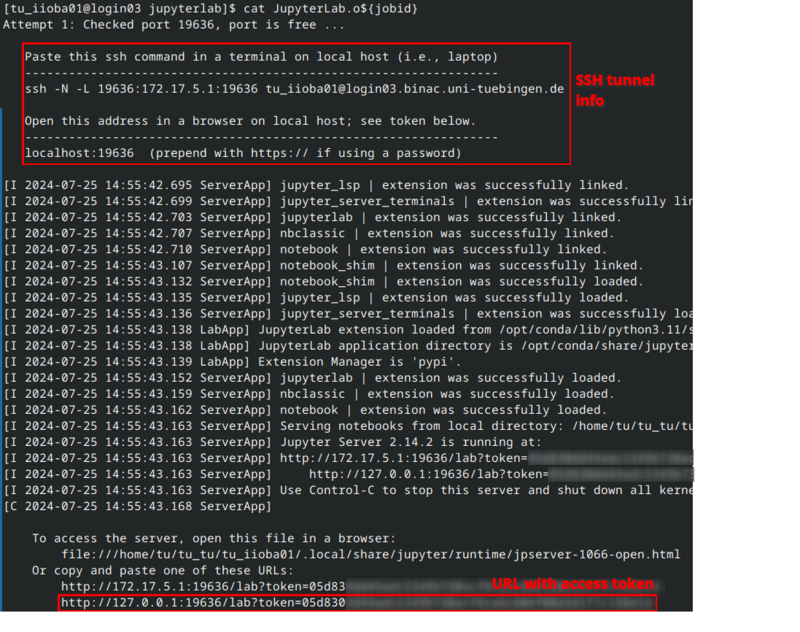
The compute node on which JupyterLab is running is not reachable directly from your workstation. Hence you have to create an SSH tunnel from your workstation to the compute node through a BinAC login node.
The job's standard output file (Jupyterlab.<jobid>) contains the SSH command for this tunnel.
Please note that details like IP, port number, and access URL will vary.
cat JupyterLab.o${jobid}
Linux Users
Copy the ssh -N -L ... command and execute it in a shell on your workstation.
After a successfull authentication the SSH tunnel is ready to use.
The ssh command does not return a result.
If there is no error message everything should be fine:
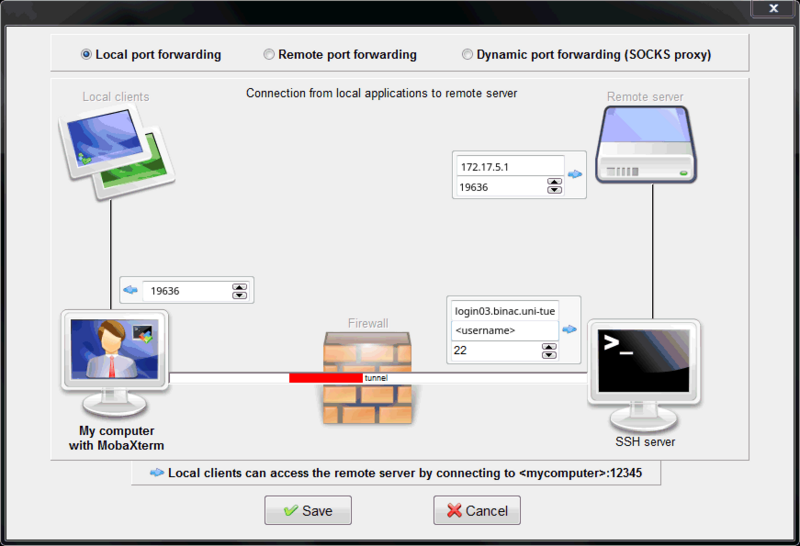
Windows Users
If you are using Windows you will need to create the SSH tunnel in the SSH client of your choice (e.g. MobaXTerm, PuTTY, etc.).
MobaXTerm
Select Tunneling in the top ribbon. Then press New SSH tunnel.
Then configure the SSH tunnel with the correct values taken the SSH tunnel infos above.
For the example in this tutorial it looks as follows:
Access JupyterLab
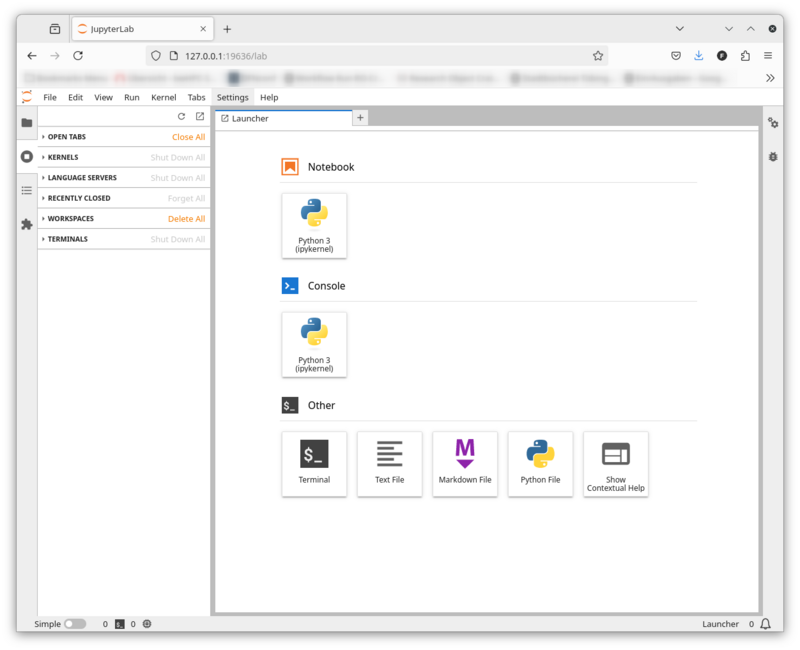
JupyterLab is now running on a BinAC compute node and you created an SSH tunnel from your workstation to that compute node. Open a browser and copy the URL with the access token into the address field:
Your browser should now display the JupyterLab user interface:
Access /beegfs/work/ in file browser
Jupyterlab's root directory will be your home directory. As your home directory is backuped daily you may want to store your notebooks there.
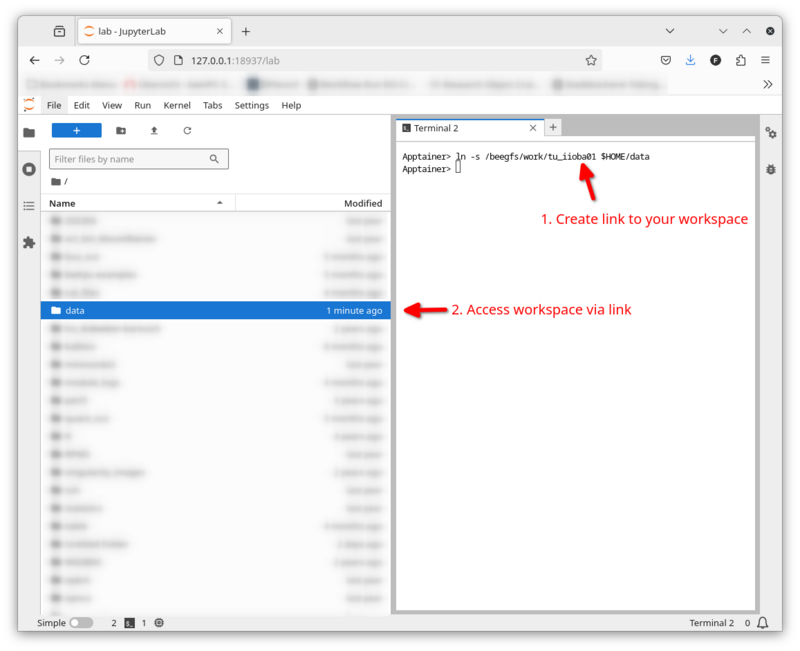
In order to access data in your workspace (e.g. somewhere under /beegfs/work) via the file browser you will need to create a symbolic link from your home directory to you workspace:
ln -s /beegfs/work/<path to your project data> $HOME/<link name>
Through that link in your home directory you can move around your research data in Jupyterlab's file explorer.
Here is an example how I linked to my directory:
Shut Down JupyterLab
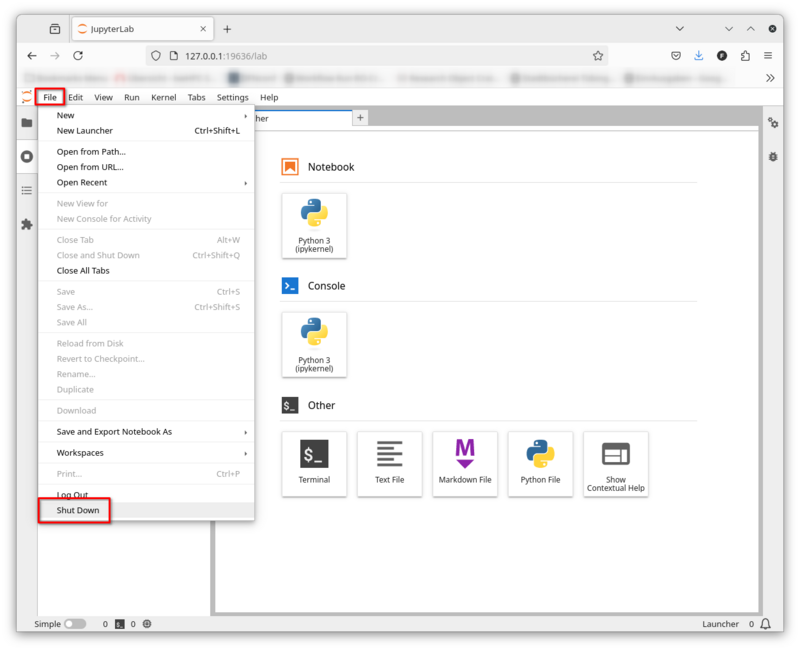
You can shut down JupyterLab via File -> Shut Down.
Please note that this will also terminate your compute job on the BinAC!
Managing Kernels
The kernels are stored in your Home directory on BinAC: /$HOME/.local/share/jupyter/kernels/.
You can install new kernels from within the JupyterLab browser window, but you will have to install Miniconda beforehand.
With Miniconda available, open a new terminal window.
Add a new Kernel
Python
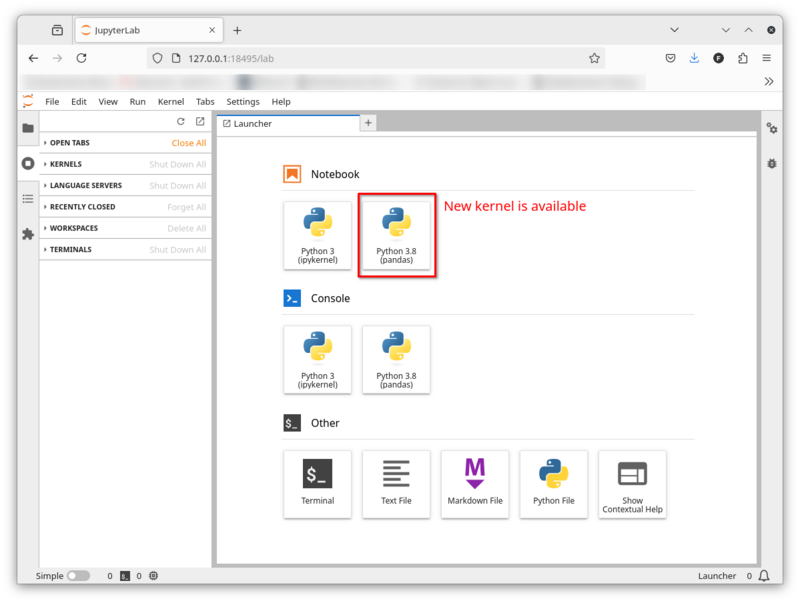
There is only a Python 3 kernel installed when you first start JupyterLab. Because there are nearly endless combinations of Python versions and packages we encourage you to install the software yourself via Conda.
This is an example how you create new kernels for Jupyterlab. It's so simple that three commmands suffice:
conda create --name kernel_env python=3.8 pandas numpy matplotlib ipykernel             # 1
conda activate kernel_env                                                               # 2
python -m ipykernel install --user --name pandas --display-name="Python 3.8 (pandas)"   # 3

# Installed kernelspec pandas in /home/tu/tu_tu/tu_iioba01/.local/share/jupyter/kernels/pandas
The first command creates a new Conda environment called kernel_env and installs a specific Python packages plus a few Python packages. It's important that you also install ipykernel. We need ipykernel later to create the JupyterLab kernel.
The second command activates the kernel_env Conda environment.
The third command creates the new JupyterLab kernel.
$ ls -lh $HOME/.local/share/jupyter/kernels/
total 0
drwxr-xr-x 2 tu_iioba01 tu_tu 109 Jul 26 10:38 pandas
R
The instructions for new R-Kernels are a bit different.
conda config --add channels r
conda create --name r_kernel_env r-base=4.4.1 r-irkernel
conda activate r_kernel_env
R
# In the R-Session:
install.packages(...)
IRkernel::installspec(name = 'ir44', displayname = 'R 4.4.1')
The first command creates a new Conda environment called r_kernel_env and installs a specific R version. It's important that you also install r-irkernel. We need r-irkernel later to create the JupyterLab kernel.
The second command activates the r_kernel_env Conda environment and open an R session. In this session you can install whatever R-package you need in your kernel.
Last, create the new kernel with the installspec command.
Remove a Kernel
In order to remove a kernel from Jupyterlab, simply remove the corresponding directory in /$HOME/.local/share/jupyter/kernels/:
# Remove the JupyterLab kernel installed in the previous example
rm -rf /$HOME/.local/share/jupyter/kernels/pandas
Also remove the corresponding Conda environment if you don't need it any more:
conda env remove --name kernel_env
