BinAC/Software/Jupyterlab: Difference between revisions
F Bartusch (talk | contribs) No edit summary |
F Bartusch (talk | contribs) No edit summary |
||
| Line 55: | Line 55: | ||
== Create SSH tunnel == |
== Create SSH tunnel == |
||
The compute node on which JupyterLab is running is not reachable from your workstation. |
|||
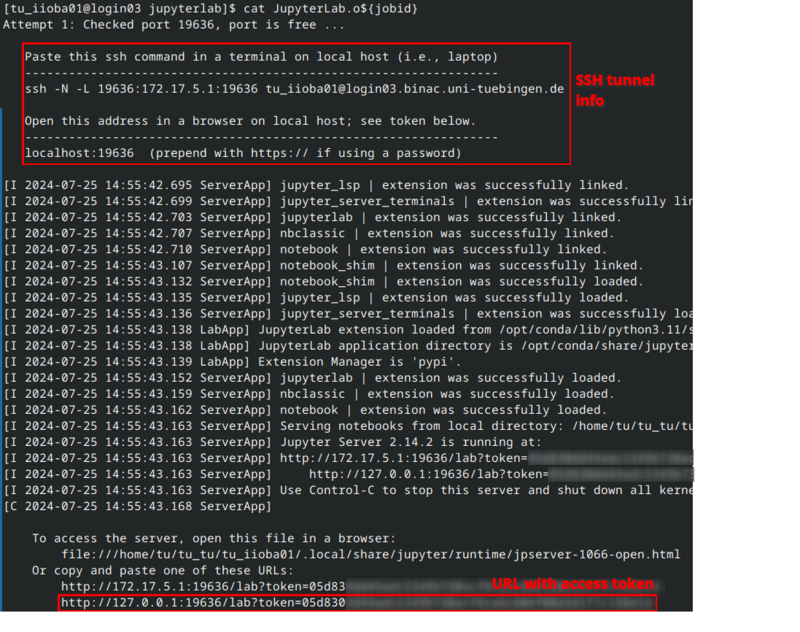
The information you need to access Jupyterlab is printed in the job's standard output file. |
|||
Hence you have to create an SSH tunnel from your workstation to the compute node through a BinAC login node. |
|||
This file is named <code>Jupyterlab.<jobid></code> and the following command will print the connection details: |
|||
The job's standard output file (<code>Jupyterlab.<jobid></code>) contains the SSH command for this tunnel. |
|||
Please note that details like IP, port number, and access URL will vary. |
Please note that details like IP, port number, and access URL will vary. |
||
| Line 67: | Line 69: | ||
=== Linux Users === |
=== Linux Users === |
||
Copy the <code>ssh -N -L ... </code> command and execute it in a shell on your workstation. |
|||
After a successfull authentication the SSH tunnel is ready to use. |
|||
The ssh command creates an SSH tunnel through which you can access Jupyterlab in your browser. |
|||
The ssh command does not return a result |
The ssh command does not return a result. |
||
If there is no error message everything should be fine (see image below). |
|||
=== Windows Users === |
=== Windows Users === |
||
... |
|||
== Access JupyterLab == |
== Access JupyterLab == |
||
Revision as of 16:41, 25 July 2024
|
The main documentation is available on the cluster via |
| Description | Content |
|---|---|
| module load | devel/jupyterlab |
| License | JupyterLab License |
| Links | Homepage |
| Graphical Interface | Yes |
Description
JupyterLab is a web-based interactive development environment for notebooks, code, and data.
Usage
Start Jupyterlab
The module provides a job script for starting a JupyterLab instance on the BinAC inter queue.
Load the module and copy the job script into your workspace:
module load devel/jupyterlab/7.2.1
cp $JUPYTERLAB_EXA_DIR/jupyterlab.pbs.template jupyterlab.pbs
You can adjust the following settings in the job script according to your needs.
#PBS -l nodes=1:ppn=1          # adjust the number of cpu cores (ppn)
#PBS -l mem=2gb
#PBS -l walltime=6:00:00
Please note the restrictions of the inter queue:
- max. walltime: 12 hours
- max. cores: 28
- max jobs per user: 1
Then submit the job.
jobid=$(qsub jupyterlab.pbs)
Create SSH tunnel
The compute node on which JupyterLab is running is not reachable from your workstation. Hence you have to create an SSH tunnel from your workstation to the compute node through a BinAC login node.
The job's standard output file (Jupyterlab.<jobid>) contains the SSH command for this tunnel.
Please note that details like IP, port number, and access URL will vary.
cat JupyterLab.o${jobid}
Linux Users
Copy the ssh -N -L ... command and execute it in a shell on your workstation.
After a successfull authentication the SSH tunnel is ready to use.
The ssh command does not return a result.
If there is no error message everything should be fine (see image below).
Windows Users
...
Access JupyterLab
The Jupyterlab output file also contains a direct link to your Jupyterlab:
cat JupyterLab.o11604591
[...]
Or copy and paste one of these URLs:
  [...]
  http://127.0.0.1:18617/lab?token=<your token>
Stop Jupyterlab
Add new Kernels
== Set
